Senin, 14 Desember 2015

Cara hack aplikasi android

Gimana cara hack aplikasi android?

Sebagian mungkin sudah tahu, tapi buat yang belum silahkan simak

Alat yang di butuhkan

Lucky patcher - Download langsung ke situs nya, karena kagak ada di playstore

Harus sudah di root, kalo belum silahkan tinggalkan thread ini. 😜 kalo masih pengen, silahkan root dulu.

Sekarang pasang lucky patcher nya, dan buka.

Cari aplikasi yang ada tulisan

"in app purchase found"  gambar 1

Pilih itu, sekarang cari tulisan

"support patch inapp and lvl emulation" gambar 2

Tunggu hingga proses selesai.

Setelah selesai, coba jalan kan aplikasi yang di hack tadi. Dan coba membeli barang yang ada di aplikasi tersebut. Kalo bisa, berarti sukses kalo gagal ya gagal gan.

Note : 📝

Tidak semua aplikasi bisa di hack, walaupun ada tulisan "in app purchase found"
Aplikasi CoC atau yang server side purchase kagak bisa di hack.

Ok thank you.

Xperia Z4 Home and Widget Mod

I just remod some widget and Home, but I hope you like it.

Download V1 Download Mega.co.nz

Download V2 http://www.solidfiles.com/d/d8e4180bfd/

How to install

Extract then

Install it one by one as user app, or
Move it to system/app with correct permission

And that's how it's worked.

Enjoy.

Work for 4.4 and 5.0
Other widget will be modified and if it's possible, I will share it.

Senin, 25 Mei 2015

How to Re-Odex apk Files directly using your android phone


Ok, this guide is only for those who need to Re-Odex an apk files after de-Odexed their apk. And this guide only applied to APK files, not framework. How to do it directly on your phone? check this out... 


Requirements
1. Lucky Patcher you can download the latest version from <<HERE>> 
2. Root explorer (this is must have app for rooted devices) and I presume you already have it 
3. Rar For Android (this is free, you can download from android playstore)


Step 1 - Setting up lucky patcher

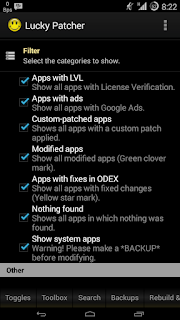
Install and open Lucky Patcher app and go to Setting, Inside the setting look for "Filter" menu and tap on it, you can find and tap to check the "Show system apps" check box. Now back to Home screen. 


Step 2 - Defining what apps you want to Re-Odex
Ok, you need to define what app you want to Re-Odex, since the process is per one app. You can't Re-Odex all apps at once. 
After you define what apps you want, copy it to sdcard's root folder. e.g Home.apk

By using "Rar for android" you have downloaded tap and hold on Home.apk until the menu showed up, and select "Open as archive"


There, you're inside the Home.apk file, Next find the "classes.dex" file and "DELETE" it. trust me just do it, it will save the system partition for the next ".Odex" file generated.


Now get back to home screen


Step 3 - Creating Odex file
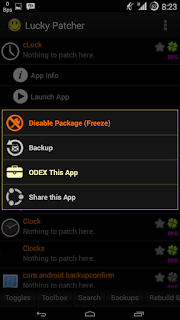
Open the Lucky patcher app, and now you need to find the app you have already backed up, now let's use another example. e.g "cLock" app, since My cLock app still deodexed. Now tap on it, and select "Tools" menu. You will be noticed that is system app, just tap on 'YES"


Now the next menu will appear, select "ODEX this app" wait, just a few second. and notification will appear telling you the process has been completed. 

Next, go to home screen, and put the app (the deleted classes.dex file) back to system/app or system/priv-app depend on what the original of the app folder location. 

Remove or replace the original file will do the same, and don't forget to give the right permission 

That's it. this process is lame after all, but this is the alternative way to save the system partition than using titanium back up app which is using too much resource and ram. 

ok thanks....

Jumat, 13 Maret 2015

[HOW-TO] (dev/mod only) (ICS/JB/KK - CM9/CM10.x/CM11.x) make your android background transparent

This is not for noob, only for advance user such as dev or modder who already knew how to decompile and recompile the apk files. let's get the guide begin 


The things you need to have


  • Latest apktool, I recommend this apktool from BDfreak (availabel here
  • framework-res.apk and/or SemcGenericUxpRes.apk
  • Notepad++ or something else you have
  • Image editor which could possibly made the transparent image I use Photoshop thou 
<< Step 1 >> Editing xml files

Now after you decompile those files go to "out folder"  framework-res.apk/res/value/style.xml

find this line of scripts 
<style name="Theme.DeviceDefault" parent="@style/Theme.Holo">

from the section above find another script contains
<item name="windowShowWallpaper">false</item>


change the value from "false" to "true" or / else you can find the script, just add the line at the bottom of the section as follow

<item name="windowShowWallpaper">true</item>

============ the part above used for CM base rom and SEMC base rom ============

Now for the special SEMC base ROM 

Find this line of script 

<style name="SEMCTheme" parent="@style/Theme">

and modify those line as follows

<style name="SEMCTheme" parent="@style/Theme.Wallpaper">

*be careful with your typos this is exactly what you need to type and watch the capslock button

Save it, but do NOT close just yet.

Open the decompiled SemcGenericUxpRes.apk go to res/value/style.xml

find this line of script 
<style name="SEMCTheme" parent="@*android:style/Theme">

and modify the line as follows
<style name="SEMCTheme" parent="@*android:style/Theme.Wallpaper">

*again be careful with you typos

And we're done with editing xml files Now proceed to another step

<< Step 2 >> Image editing 

On the decompiled framework-res.apk go inside the res/drawable-hdpi 
*it depend on what device you working at mine was HDPI device so I edit the image inside the "drawable-hdpi" folder it possibly on the other folder such as (nodpi/ldpi/mdpi/xhdpi) folder so look for yourself, savvy?

Now find the file named as background_holo_dark.png
*again, I am not guarantee this is the exact file you need to edit, find the respective file maybe it's not an image but an xml files and it located on the "drawable" folder so look for yourself, aye?

After you find the file, edit with respective image editing tools/program and make the image as transparent as you wish, but do not adjust to full opacity its need a bit opaque, maybe 60%-70% transparent value. 

after you've dealt with it, save the image with the same name as original files, and replace the current file.

============ the part above used for CM base rom ============

Now for the special SEMC base ROM

on the same folder find semc_bg.png (both, if you find more than one file)
with the same way, edit your image.

when it's done, save it and replace the original file

next, we work with image inside the SemcGenericUxpRes.apk in the res/drawable-hdpi or something else
find image file named as semc_bg_tile.png

and make it transparent with the same way. -_____- *meh

And we're done with all step, easy right? *yeah, you just reading it. 

<< Step 3 >> Recompile all decompiled files 
<< Step 4 >> Push all those file to your android, and reboot.  And hope, it won't bootloop. 

Thank's for reading it, See ya. 

Minggu, 25 Januari 2015

XPERIA Z2 FEEL, ROM MOD CM11 HAIDA

SERAPHIC PROJECT presents you

XPERIA Z2 FEEL

Quote:
Ok not so much changed, but take a look at the screenshot above may give you some attracts to this thread
Quote:
  • first I would like to say thanks to doomlord who has provide his z2 system dumps
  • you for spent your time reading this thread, and may consider to try it
For the thread go to